Tuesday, 17 March 2015

Organisation

I found a great idea on the Internet, perfect for taming cord spaghetti.

This is how I did it:

Take a charm square and apply interfacing to half of the wrong side
Sew around the edges making sure to leave a gap for turning
Turn to right side and edge stitch all threat around
Apply small squares to both ends, one each on each side, one at each end


For smaller skinnier cables I cut long and skinny fabric. After I. Sewed it into a tube and cut it to length I applied bias tape on one side to stabilise it. Then I sewed the Velcro on


I want to post a pic but having issues. Will try again later.


Edit: Hooray! Finally worked out how to get the picture off my phone and into this file.

These cord tamers are sweet and easy to make. I made my husband some fabric pouches for when he travels; now he can tame those cords i n the bag. Perfect.

Sunday, 22 February 2015

This is much better than it looks

I have a much under-utilised  food processors- right now the name escapes me and I can't be bothered going to the kitchen to look ;o)  It is possibly a Cuisinart.


Anyway.....  I love nut butters. I don't know whether to be saddened or relieved that Number Guy hates them. Hmmm.....Anyway (part 2) I saw a recipe for  pecan butter and decided to give it a whirls.  I bought 3 bags, ate about half of one and chucked the remainder into the food processor this morning. I sure am glad that I went for a good model of FP- although the nuts became warm due to the action of the blade the machine itself didn't come close to becoming warm.

Anyway (part 3) if I can get my phone and Mac talking to each other I will post a pic. Here goes.


(Hooray! It worked. What a PITA- I have to do so much fiddling about that I cannot remember what I did)

 This may not look inviting but  believe me it is divine. I added a little salt and some maple syrup- 2 tbsp of the latter, a good pinch of the former. I may stir in a little more of both, we'll see. My next step witl be to make some candied almonds and then make those into  nut butter.  Yumm.

Tuesday, 10 February 2015

Economy Block

I am not sure what it is about this  quilt block that I like, but it is my new favourite thing to sew. It is a paper-pieced block (but an also be done 'freestyle'). I saw it a few times on http://www.redpepperquilts.com/ and shelled out the very reasonable price of $2-00 for the PDF


This block has a few different names, such as exploding square, square in a square, but I like the name it has on Red Pepper Quilts- the Economy block.  I am also very happy that one of my Accuquilt dies cuts our the shapes I need. It is called the Value Die, the name of which I think goes neatly  with the block  name.

I think this might becoe a quilt,  but I am not going to get all stressed out, traing to do it in a very short time. I am going to fit these blocks in between other projects.. When i have enough I will will decide what I want to do with them.

Wednesday, 4 February 2015

Go!Baby

I have finally jumped on the die cutter wagon. Over christmas I saw a lot of people posting about Accuquilt productshttp://www.accuquilt.com/. Finally I could stand it no longer.

There are four options to choose from. I deliberately chose the smallest. There is a large number of dies for this little beauty, many the basic building blocks of quilting.

At the moment I am seeing half-square triangles (HST) together to form 3" squares. They are for some time in the future. This block is very versatile and there are numerous arrangements.

I have also started piecing Drunkard'sPath. This is another classic. Each unit is a quarter circle pieced into a square. It would be very laborious cutting the individual pieces with templates. The Go!Baby makes short work of it.  As is the case with the HST, this is a block which can be combined in a myriad of ways. Again, I am just going to piece and sew and when I have enough for a projects, be it a cushion, an apron or a whole quilt, I will decide what to do. In the meantime I am enjoying piecing the  Drunkard's Path, but it is a little tricky

I will purchase a bigger cutter some time in the future but this handy little cutter will still get a lot of use

This pic has both of the above blocks in it. Half Triangle Square is 3"


And of course, no sewing post is good without a gratuitous kitty pic. 
This is Willow. He is a Devon Rex boy of about 6 months in this picture
 above. In the image below we can see  a very sleepy Gittan being sniffed over by a curious Willow. Gittan is a 3 yo Devon Rex.  I can't say just how wonderful it is to have cats in our lives again :0)


Tuesday, 12 August 2014

not much going on...

..things have been quiet-ish here. Well, on the craft side. Pain-wise it has been crap.
But enough of that, I am doing a little sewing knitting etc.

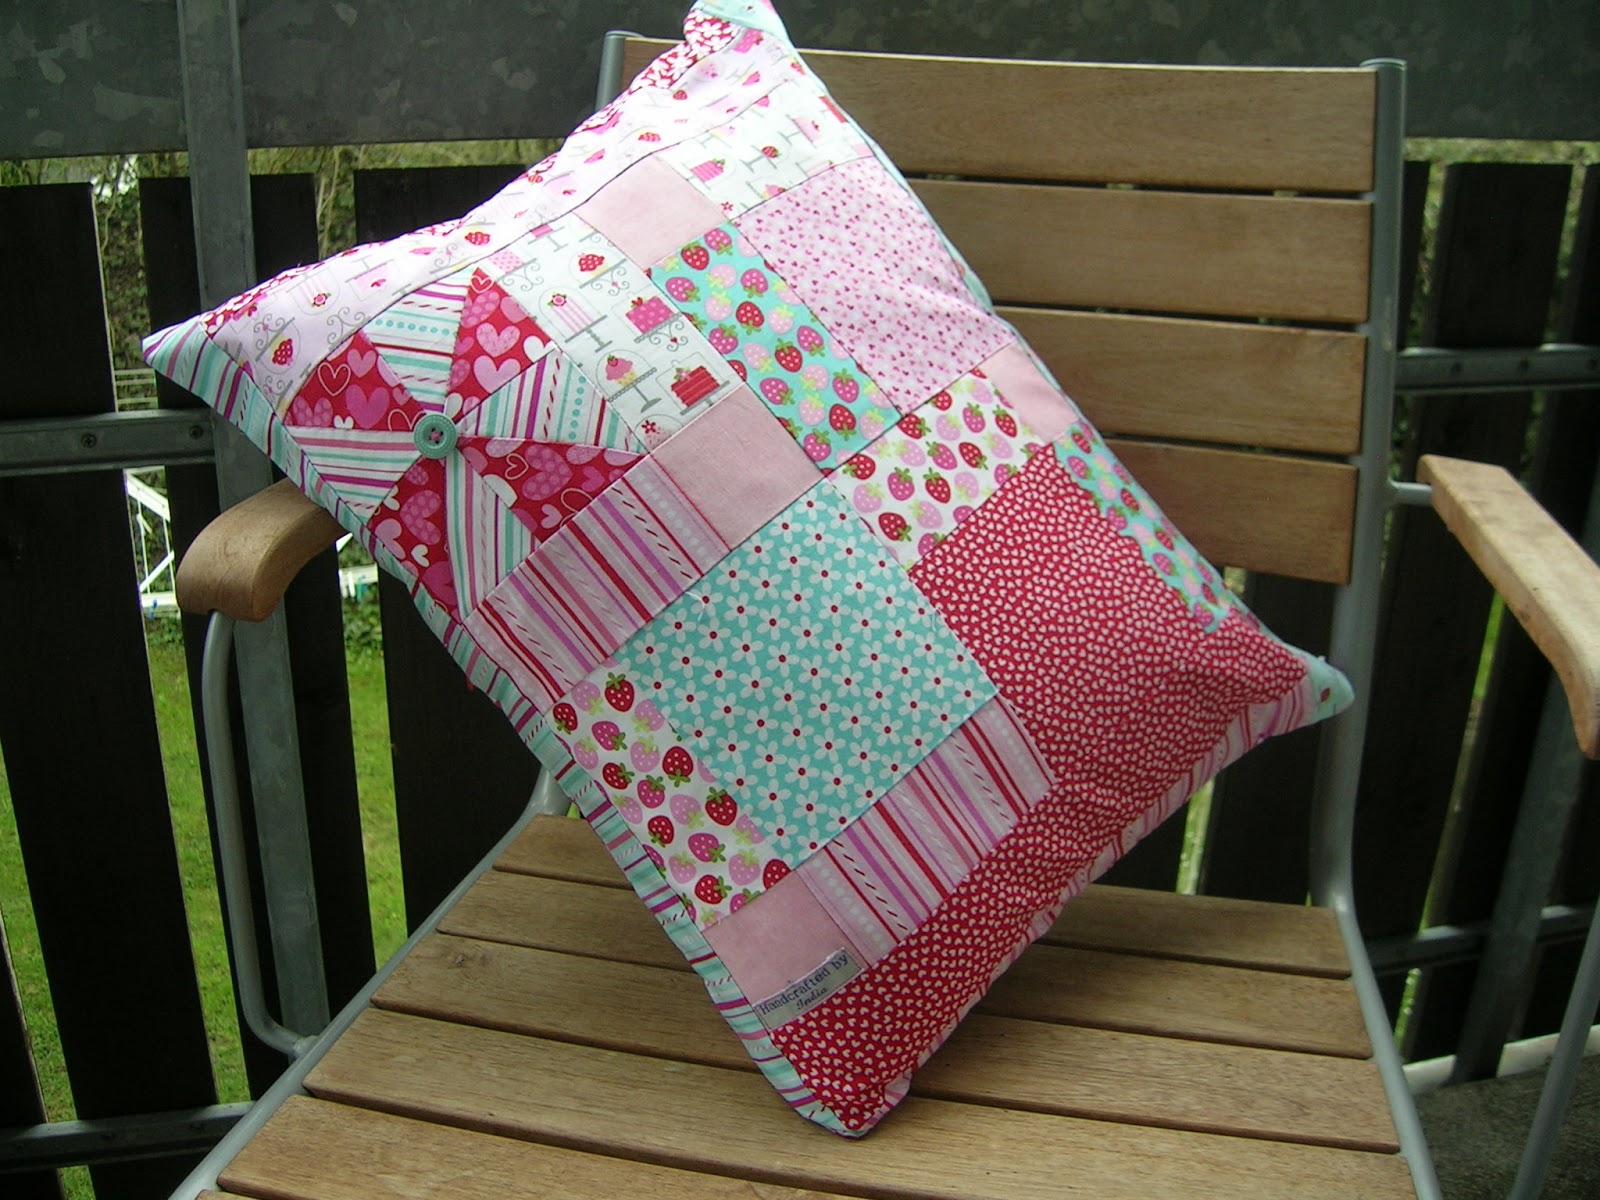
This is the very simple 9-patch block (with a pinwheel square). I usually like to make this into a 'disappearing 9-patch' but I think it is busy enough as it is. T


his is going to be the front of a  cushion cover for my sofa. I did an amazing pink/ red/ white one and then brought it to my sewing room to measure...then I never saw it again. Weird. Let's hope the same doesn't happen with this.

I have also made four 'Ruby' Tops, designed by 'Made by Rae'. Here is the latest:


The fabric is from Michael Miller. Aptly named 'Giraffe Love' ;0)

Tuesday, 27 May 2014

Ruby III


The yoke is a Michael Miller metallic print and the  body is a sheer cotton with a silver thread running through.
I used the Bernina Flat Fell foot 71 to do the seams- the flimsy nature of the main body fabric meant it needed some sort of finishing. This is a nice alternative to a French seam. First time using this foot. The stiffer fabric was really easy to sew but the first pass through for the flimsy fabric (a flat fell seam has two lines of stitching) was a real pain in the ass. Worth it though, I like the finish. I also used the  edge stitch foot to put the bias tape on. That also made things a bit easier than normal.

Tuesday, 6 May 2014

Ruby

My Sorbetto plans have come adrift. There was a nasty gape at the armholes. When I went online  to find a tutorial for 'gaping armholes' I was amused to see that the  person who made the tutorial used Sorbetto ..so I am not the only one. I was really delighted to see  this top available as a free download- I have seen a number online and they looked great. But I am going to have to follow the online fix before I attempt this top for the third time.

Instead, I  bit the bullet and bought Ruby, designed by' Made by Rae.'  The pattern  download went smoothly and I was happy to see that the various sizes have different coloured outlines. The instructions were very clear and I would recommend this as a good beginner project, easily whipped up in an afternoon if you are an experienced needlewoman.  here is Ruby I


And here, under construction is Ruby II

Friday, 25 April 2014

Coming to a blog near you

I am quite often late on the bandwagon. In this case it is with the sweet little Sorbetto  https://www.colettepatterns.com/sewing/sorbetto. I did have plans to do it in a great Zombie fabric but I 'put it away' and can't find it. Never mind, I am sure there will be more than one of these on the go.

The pattern was very easy to download and piece together, I hate the thought of having to do the same with something more complicated.

I need to get some silver bias tape tomorrow and then it will be full steam ahead. I could start it tonight but I am tired and even though this is simple I don't want to have to get the thread ripper out


Saturday, 12 April 2014

wrong blog

idiot that I am, I managed to post on my old account. Updates will be here

Tuesday, 25 March 2014

A walk in the woods almost at an end

I have been making a quilt. The very easiest type, wholecloth.

The fabric is printed in panels and I simply sewed the quilt sandwich by following the edges of each panel.  That being said, it is a bit rough'n'ready.


The fabric is called 'Norwegian Woods', the designer's name escapes me for a moment. The deluge of fabric at the bottom right corner is the binding. I cut straight strips (as opposed to on the bias) joined them with a diagonal seam to reduce bulk at join, and then fed it through a nifty tool which fold the fabric 'sides to middle'. Once the iron is passed over the strip, the tape is formed and ready to sew.

To be honest, my preferred method of attachment is to machine sew one side of the strip along the edges of the quilt, fold it over and then slip stitch in place. This makes an invisible attachment. Bt I paid an exorbitant price for a bias bider attachment gizmo for my Bernina, so I am going to take it for its maiden voyage on this quilt.

OK, that was a v ery rambly post, but at least I have managed to post this week!

Monday, 17 March 2014

Sewing

I am in the process of making a linen skirt. I have carefully tacked the pleats in place. It was a bit of a pita and for some reason I couldn't get the last one folded properly.

I am in a quandary. I need to lose half a stone or this dress to fit...or I could alter the pleats and the waistband. I think I'll lose the weight..


The pleats are very soft- they are not stitched down, simply held in place by the ine of sewing at the waistband

Sunday, 16 March 2014

Never Let Me Go

Sigh. I read the this novel by Kazuo Ishiguro a long time ago now. I missed the movie when it came to Zürich but good old Film Four played it the other day. All in all I think it was a good adaptation. Ver, very moving. My heart is all clenched up.

Wednesday, 5 March 2014

Breaking radio silence

...Of almost a year to say I am in love with my latest household tool- the hand-held vacuum cleaner. It is so handy. Times when I just cannot be bothered lugging the big Dyson out, along comes the 'Dirt Devil.' It is particularly handy when I have been cutting fabric out for a skirt.

Last year was very rough- I had terrible ,terrible pain from trigeminal neuralgia. * emergency admissions to hospital as a result of the side-effects of the treatment for the TN. Finally, in December enough was enough. The weel before christmas I had neurosurgery. It has definitely helped. I wouldn't say I am cured.

Anyway, I intend to post here once a week, to see if I can breathe some life into the poor beast which is  my Blog.

If only I had labelled where this beautiful piece of artwork is from...anyway, I leave it here in lieu of an interesting knitting shot.

Monday, 29 April 2013

Pattern Drafting

 I won't be alone in having enjoyed the recent BBC programme 'The Great British Sewing Bee.'

I can sew already, and indeed I have been  sewing various home dec projects, such as this cushion cover:

 I have  a fair fabric stash and a number of clothing patterns I wish to sew this year. I have been waiting until I lost some weight- who wants to put in a lot of effort  to sew something beautiful, only to find that 2 months later it doesn't fit. So (sew? ;0), now that I have lost 2 stone in weight (28lbs) I am ready to sew. What the GBSB has inspired me to do is to  improve the fit of my handsewn garments.  To start everything off, I have hand-drafted my first pattern.  It's pretty amazing:


Yep, I have hand-drafted my first camisole pattern! Well, one has to begin somewhere, right?
I simply traced the outline from a camisole which I like the fit of. The fabric that you can see is a peach bamboo 2-way stretch jersey. I figure it will be comfortable to wear and  'cool' in the summer. Above you can see some of the trimmings which I have. Can't decide whether to go for a strong contrast, such as the turquoise, or something less  stark such as  a pale chocolate elastic which I don't think is visible above. I'll just have to wait and see.

Happy sewing!

Saturday, 3 November 2012

Origami Bag

So, the christmas crafting continues. I am making the Origami Bag for some of my female 'giftees'. I will add  some small toiletries to these wee bags and I think it will make a welcome gift.

I think that the houndstooth/pink combination is an elegant one. I also hope that  even those who are not big pink fans (unlike myself) will  nonetheless like the little flashes of pink.

For future reference for myself: I made the pattern 50cm x 50cm, whereas the original  suggestion is 41cm x 41cm which I personally feel is too small.
Also: the  label should be sewn on   parallel to the first vertical seam which holds down the triangle points through their long sides as soon as that seam has been done..this makes for much easier sewing and much less wibbly seaming.


A big thank you to Jill:

http://jembellish.blogspot.ch/2012/05/fabric-origami-bag-photo-tutorial.html 

Sunday, 21 October 2012

Crafting

I have been busy today.  I have never previously been overly interested in 'home decor' and I don't think that I am ever going to be 'overly interested', but I have a few things which I have been working on lately and have  posted here, such as  curtain panels.

Having put up the three Amy Butler curtain panels in  our bedroom I wanted to  jazz up the bed linens a bit.  Today saw the first of (many) pillow cases.  This was relatively simple but....there's always a but...when I was sewing one of the long hems  I managed to get a hole in the main body of the  case.  A bunching up of the fabric occurred and the knives on the overlocker just went straight through. Lucking  I realised this while  there was 'only' a  hole of a few inches length.     This meant a repair before it was even finished. If you look at the bottom right-hand corner of the blue fabric you  will be able to spot it. I ironed interfacing onto the back for the piece with  the hole and  I put a new piece of fabric on the front and then did three rows of concentric stitching to hold that baby down.


Next came the trimmings. The two  were also sewn down securely. I don't know  if the pink 'bobbles' will be too bobbly and therefore uncomfortable,  but it is going to be severely tested with much sleeping tonight :0) The original pattern had the contrasting fabric  at the end folded over and sewn down. This does make for a nice luxurious feel, but it is useless in terms of keeping the pillow in the case. Therefore I did a minor adjustment which means that the folded over part now forms an envelope in which to stick that end of the pillow. I hope it is deep enough....it is deeper than the front red section.


I am going to keep my eyes open for more fabric which appeals and also for trimmings- a relatively low-cost way of adding some  luxury to   sewing projects

Tuesday, 9 October 2012

Fast'n'dirty Pinny Porn


Yah, boo! Suckers! Go find the  kinda blog you hoped you were getting!


Edit: Le Sigh...should of course be 'waist band' but I can't be bothered looking for all of the typos tonight...
Edit: and I just found the wrong 'so/sew'...and a grocer's apostrophe.....ACK!
In the meantime:


There has been some sewing. This apron idea was not mine...if you Google 'Fat Quarter Apron' you will get lots of results. Unfortunately I can't find the link which I used.

But.. basically...get a fat quarter and cut enough from one of the slightly longer sides which can be folded in haf with a seam allowance sewed under. This forms the waist band.

 Use a plate or  whatever circular  object  is of the correct proportions and  mark a curve at two bottom corners. Cut following this line. You can see the desired effect above.

Next I formed a pleat in the middle and hand basted it in place- takes a few seconds and just makes life a bit easier

I then  used Bias Tape to cover the raw edge of the fat quarter, along three of its sides. The great thing about Bias Tape is that it goes around corners like there is no tomorrow :0)

When I attached the waste band, which covered the ends of the  Bias Tape, I slipped more of the  Bias Tape around the front of the waste band, since I liked the effect. I also  remembered to tuck in the tape which I was using for apron ties into the  open ends of the waistband.

Sewed it all in place ..oh, forgot to mention, I also made a hanging loop which you can just see peeking out of the top left corner of the picture. This was my one 'design' feature ;0) This was pinned in place and sewn with the waistband

This was real fast and dirty sewing. I didn't have any orange thread. Not  one. So I went with the blue which I had in the machine because I was being lazy. I could've taken time to  lovingly find  the perfect contrast.. but this apron is a one-night stand, not the love of my life...even sew, some of my sewing was appalling...looks like a drunk has taken my sewing fo a walk.

But....there's alway's a but...this took an hour to make from getting the fabric out (pre-washed!) to cutting the last threads. Can't say better than that.


See what I mean about that sewing???

Monday, 1 October 2012

There's always a 'but'

I really have the crochet bug at the moment. I have stalled in the middle of a crocheted jumper, simply because it will not fit properly until I have lost a few more pounds....which shouldn't take that long, really, but it has been enough to halt me with simply one sleeve left to finish.

In the meantime I am crocheting a blanket...or should I say, another blanket. I think that makes four in various stages of creation. The top and this blanket are both by Doris Chan.  I think Doris designs some beautiful things. But...and there is a  but... her 'crochet mind' works differently from mine. That means that  when I am following her instructions for garments I do a fair bit of frogging (that's ripping out completed work to the uninitiated ;0). As you can imagine, this is very, very frustrating  But...because there is a but....when my crochet mind aligns with Doris' crochet mind, I can really appreciate the elegance of the design. And here I mean not the finished garment, but by the actual design of the garment. She has some sophisticated solutions for design problems  The kind that appear to be simple solutions but in reality have a lot of thought behind them.

But...back to the blanket. I had in my mind jewel colours separated by a pale grey. A somewhat mottled grey, not solid, but icy-white with the edge taken off with wisps of cool grey. I did not want white. I did not want cream. The yarn also had to be acrylic. Again for the uninitiated, it is generally a bad idea to mix different yarn bases together since it affects the laundering process. As the blanket was mainly acrylic, for    hard-wearing indestructibility,   the yarn for which I was seeking also needed to be acrylic. But ...because there is a but...I simply could not find a grey acrylic yarn which even came close to what I had imagined. There wasn't even a wool yarn which came close to what I had imagine. But...you know where this is going, right?...because ....I am impatient I thought I would grab some superwash yarn  which would 'just do.' Well, it just won't. The 'superwash' label means that it can in theory be machine washed. Not that I  planned to, but this at least meant that when I hand washed it I shouldn't have too much of a problem with it. It wouldn't behave wildly differently from the acrylic. But man...it sucked, big time. Sucked all that beautiful jewel-toned vibrancy right outta that blanket. And that just wouldn't do.

I hand craft because I love both the process and the end result. There is no point in continuing with something if you don't love it. What I am asking myself is: Why the hell didn't I listen to that voice in my head telling me that the grey yarn 'wouldn't do'? Voices in the head are worrying. But when they  are giving crafty advice they are generally best listened to. I've been here before. I'll probably end up back in this place again. Hopefully not for a while.

I went back to the shop. Took a long, long time looking for a cream yarn. Again, somewhat surprised (nay, amazed) that  I could not even find cream 'baby yarn.' (How cool is that, eh? Knitting a baby.) Right next to it was some grey yarn which came fairly close to what I had imagined. But I decided not to take the risk. I didn't want to spend any more money on even one ball of yarn which might not be right. So cream it is. Again it is superwash wool. This time, though, it is very soft superwash wool, much closer in 'hand' to that of the acrylic, so I am also much happier with that.  I bought one ball of the yarn and rushed home and completed a few motifs to see how it would look. Here it is:

I think you would agree, the cream is much, much better. It looks very white here, but trust me, it is cream.

The blanket pattern, should you be interested, is the All Star Blanket, Doris Chan. Again, the design of the star motif is elegant. Just what I expect from Doris.

And the grey yarn? I have a short-sleeve jumper pattern all lined up. I plan to wear it with a  scarf  at the neck, to deal with the colour-sucking properties of the yarn.


Wednesday, 26 September 2012

Cobblers!


Chicken Cobbler(s)

I have another in the freezer, a portion of chicken stew without the cobbler topping also in the freezer plus two lots of...hmm....can't think of the words...mirepoix... ready to form the base of some soup. When my energy is limited I like to make the most of it.

Wednesday, 12 September 2012

Old Shale

Also known as 'feather and fan,' Old Shale is an old, well-known  stitch pattern  common in Shetland shawls.
it is  to be found in Hap Shawls and was where Brooklyn Tweed's Baby Blanket found its inspiration. For quite some time I have wanted to knit this simple, effective shawl cum blanket for snuggly winter days, so  when we were on our recent holiday to Reykjavik I had this pattern in mind when I was doing some of my fabulous yarn shopping. (Well, Number Guy, when you said 'Buy more Icelandic yarn, for us it is really cheap.' I took you at your word, hence the 76 balls which found their way into our baggage....)

  There is lots of lovely yarn around but I wanted something which was  soft, but not merino-soft. I wanted a bit of texture in there as well. As soon as I got my little mitts on
 Kambgarn I knew  that this fit the bill perfectly. And yet it is apparently merino! Well, that's totally fine. The only rule I had when we were in Iceland was that I buy yarn produced there. So several balls of this were added to the basket.


The yarn was beautiful to knit with and I cast on while we were still on holiday. The simple garter stitch square which forms the centre of the blanket was very soothing. I wasn't up to anything at all complicated because I was in the middle of a medication trial which  was terrible.Let's just say that it had absolutely no effect on my trigeminal neuralgia and I was suffering greatly. In addition, I was still  doing my best to get out and about and sight see and that plus the pain left me exhausted, so evenings of simple knitting  and an audiobook were just what I needed. I finished it a  couple of weeks ago, save for the ends, and here is the blocked result:


I love the creamy yellow colour which reminds me of ripened fields of grain and the yellowy-green  of the border is a satisfying contrast.

I have enough of the Kambgarn to make another Sweet Tea, a crocheted camisole.


 I have made this pattern recently and really enjoyed the process and the finished product. The Kambgarn has knitted up into a lovely swatch so I think it'll be great in the camisole.


The remainder of the yarn haul is the well-known Lett-Lopi and  lots of a laceweight yarn called Einband. This yarn actually feels appallingly rough in the skein but I have been assured that upon washing it softens considerably. I sure hope so as I have a lot of it....

And would I recommend a trip to Iceland? Well....when we first got there, the day after a fabulous sunny week in Stockholm it was cloudy, raining, cold. The bus to take us from the airport to reykjavik was broken down and we had been travelling since 4.00am.As my husband said,'If anyone wants to come to Reykjavik, I'm going to recommend Stockholm' ;0) But...the weather turned the next day and we had a  great time.  Neither of us wanted to be driving on this holiday: I was too ill and Number Guy needed some serious relaxation. Therefore we booked three tours with   Reykjavik Excursions . I thoroughly recommend this company- they collect you at your hotel, the buses are clean and safe and the guides friendly and knowledgeable.

So, all in all, a great time was had by the both of us and I came home with lots of knitterly loot. Perfect:0)